
只今WordPressのテーマ制作の勉強をしておりますまっちーです!
WordPressでメニューにふりがなを付ける方法を書き留めておきたいと思います。
メニュー名の上に小さい文字で書かれているこういうやつですね。

まずふりがなではなく、サブナビゲーションなどと言われるようです。
(どおりで検索しても全然ヒットしない)
それでは作っていきます!
functions.phpにコードを追記する
functions.phpに以下のコードを追記する
add_filter('walker_nav_menu_start_el', 'description_in_nav_menu', 10, 4);

function description_in_nav_menu($item_output, $item){
  return preg_replace('/(<a.*?>[^<]*?)</',  "<br /><span>{$item->attr_title}</span><br>$1<", $item_output);
}参考:Offise Kondo【WordPress】カスタムメニューでサブタイトルつきのメニューを作成する方法
サブタイトルを入力するフォームを表示させる
管理画面→外観→メニュー→表示オプションをクリック
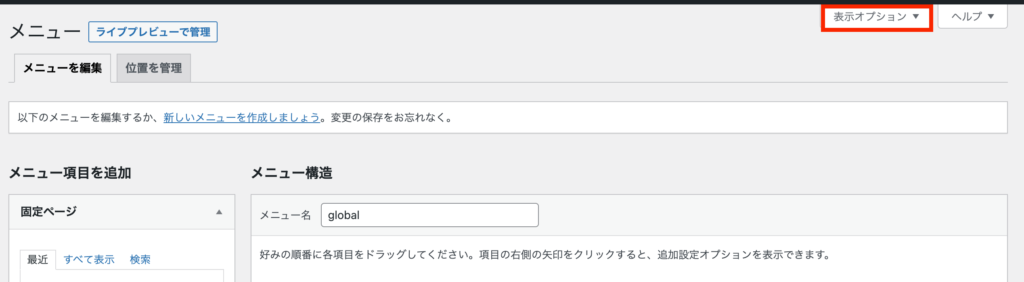
「タイトル属性」にチェックを入れる

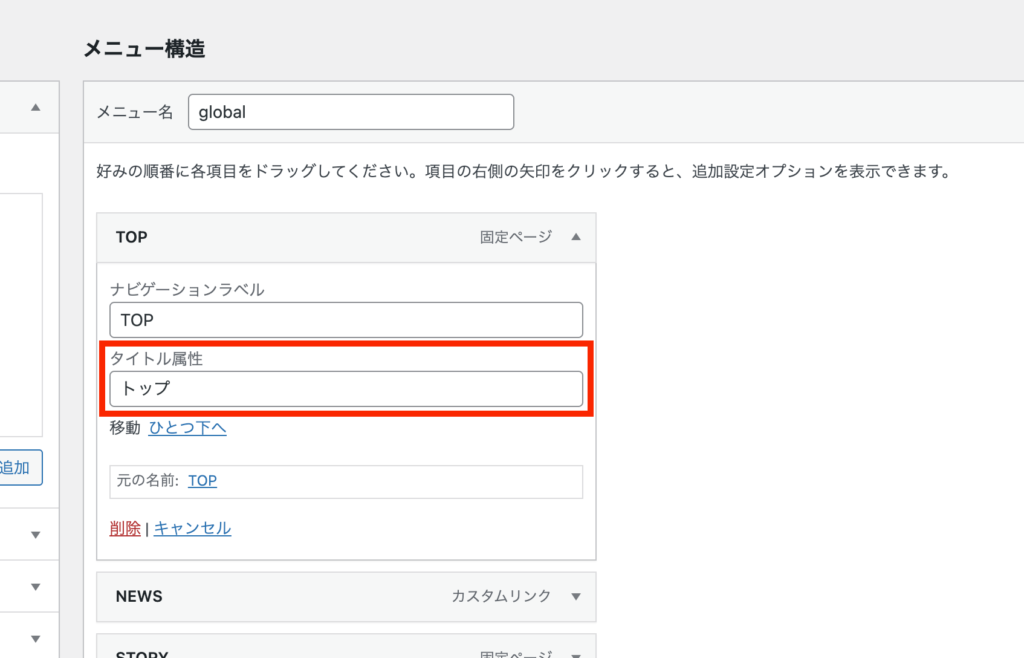
サブタイトルを入力する
メニューの項目に「タイトル属性」が表示されるのでこちらにサブタイトルを入力する
するとこんな感じで表示されます。少し文字が大きい。

CSSでスタイルを調整する
サブタイトルには<span>タグがあたっているのでこちらにCSSをあてれば完成です。

できた!
その他のカスタマイズ
メニューの下にサブタイトルを表示させる
functions.phpに以下のコードを追記する
$1と{$item->attr_title}の位置が入れ替わっています。
add_filter('walker_nav_menu_start_el', 'description_in_nav_menu', 10, 4);

function description_in_nav_menu($item_output, $item){
  return preg_replace('/(<a.*?>[^<]*?)</',  "$1<br /><span>{$item->attr_title}</span><br><", $item_output);
}
できた!

フォーム名を「タイトル属性」→「説明」にする
そもそもタイトル属性とは、マウスホバー時に表示するテキスト用に使われる要素だそうな。(自信ない)
また、サブタイトルを入力する項目として、「タイトル属性」より「説明」の方が分かりやすいと思ったので、項目名を「説明」に変更します。
functions.phpに以下のコードを追記する
add_filter('walker_nav_menu_start_el', 'description_in_nav_menu', 10, 4);

function description_in_nav_menu($item_output, $item){
  return preg_replace('/(<a.*?>[^<]*?)</',  "<br /><span>{$item->description}</span><br>$1<", $item_output);
}前述したコードの{$item->attr_title}部分が{$item->description}に変わっています。
表示オプション→説明にチェックを入れる

メニューの項目に「説明」が表示されるのでこちらにサブタイトルを入力する

この方法でも表示されます。
おしまい
暗号のように見えていたPHPですが、いくらか暗号ではなくなってきたような気がします。
自分なりに調べて少しカスタマイズできて嬉しかった記念の記事でした。お読みいただきありがとうございます!